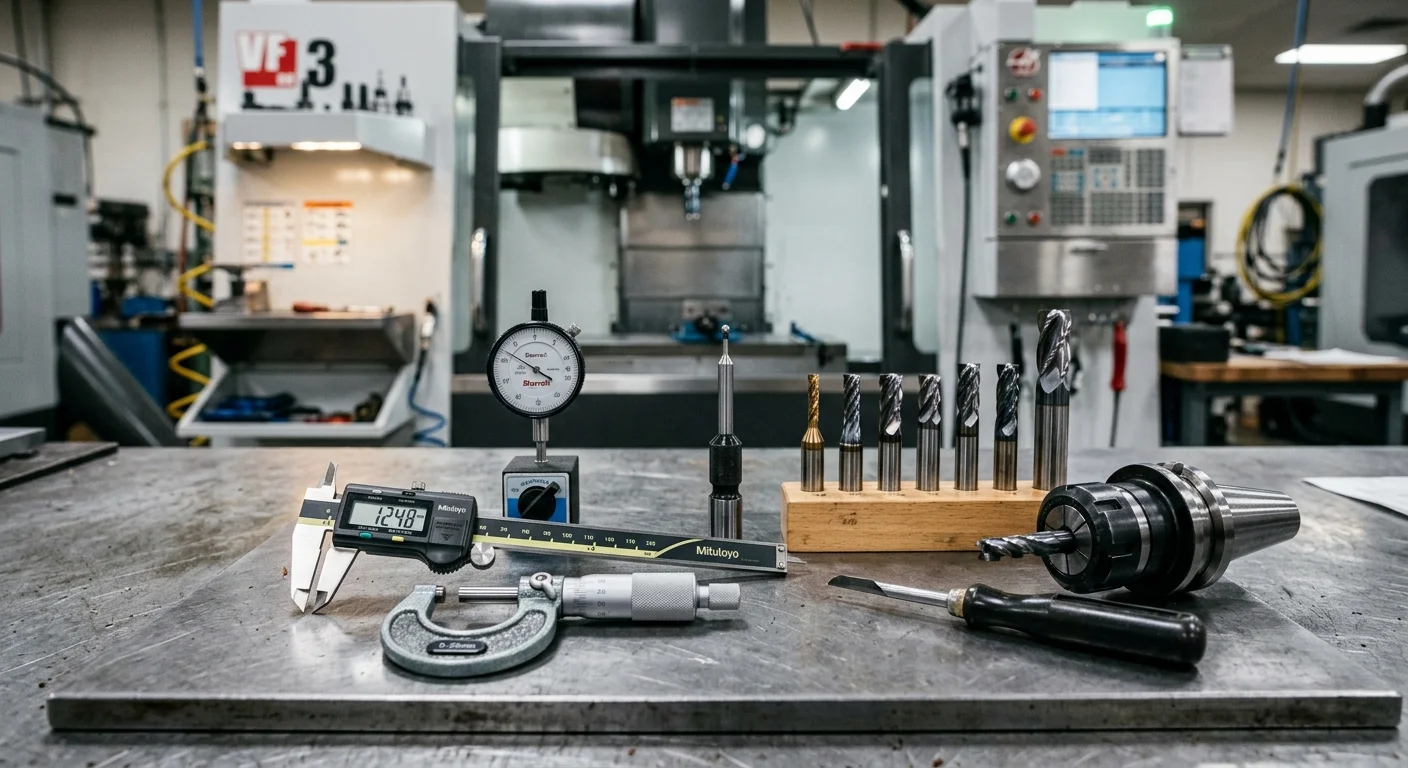
Talk to a veteran CNC machinist and you’ll quickly learn that the trade is built on two things: the machine and the measurement. The machine does the cutting, but the machinist’s hand tools — calipers, micrometers, indicators — are what verify that the part actually came out right. A program that runs flawlessly on paper can still produce scrap if the setup was off by a few thousandths.
That’s the reality of precision machining. Tolerances on aerospace brackets, hydraulic valve bodies, and medical implants are routinely held to within ±0.001” or tighter. Getting there requires not just a well-maintained CNC machine, but a machinist who knows how to measure properly, set up a part correctly, and verify results with the right instruments in hand.
Whether you’re starting a CNC machining program at a trade school or stepping into a machine shop for the first time, this guide walks through exactly what tools you’ll need, what to look for when buying, how much to budget at each stage, and how to keep your gear in good shape over time.
Day-One Essentials
Your first day in a machining program or shop won’t call for the full professional kit. But there are tools you need right away — measuring instruments and hand tools that appear on virtually every machining student’s required list. Your program may specify certain items; always follow that list first, but the tools below form the core of what most programs require.
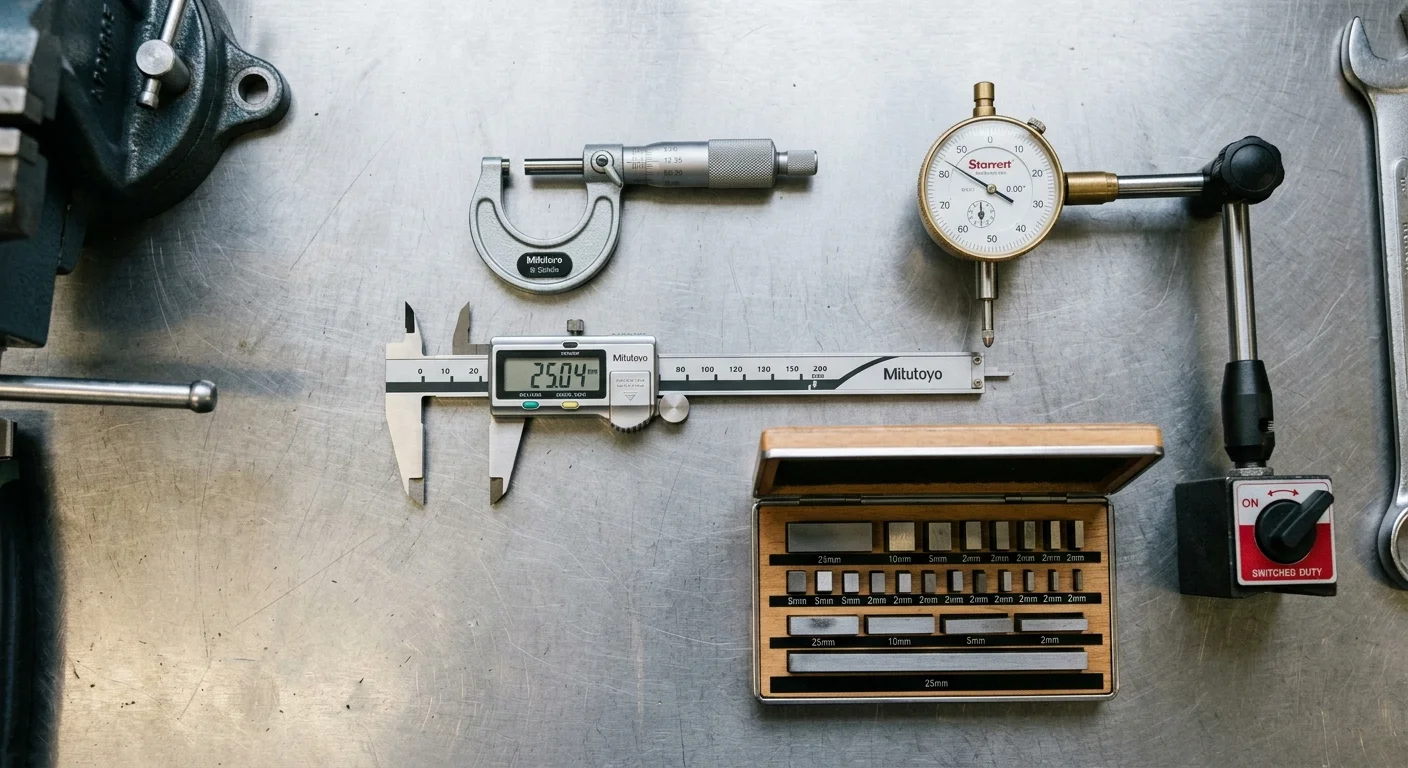
Digital or Dial Calipers
Calipers are the workhorse of the machinist’s toolbox. They measure outside dimensions, inside dimensions, depths, and step distances — all with one tool. Digital calipers display measurements on a screen and are fast to read; dial calipers use a clock-face dial and are preferred by some machinists because they don’t rely on batteries and the analog readout makes it easy to spot direction of movement when taking measurements. Either type works well. A 6-inch caliper handles the vast majority of work you’ll encounter starting out.
Outside Micrometer
Where a caliper gives you quick measurements to ±0.001”, a micrometer gives you more precise readings — typically ±0.0001” with a vernier scale or digital readout. Outside micrometers measure shaft diameters, stock thicknesses, and other external dimensions. A 0–1” micrometer is the most commonly used range; a set covering 0–3” handles most entry-level work. As you advance, you’ll add depth micrometers and inside micrometers to your collection.
Dial Indicator and Magnetic Base
A dial indicator mounted on a magnetic base is how machinists check that a part is running true before cutting starts. It detects runout, flatness errors, and part alignment. When you’re learning to indicate in a vise or chuck, this tool is what tells you whether the part is actually sitting square or slightly off — something you can’t determine by eye. Get a magnetic base that locks down solidly and a dial indicator with at least 0.001” resolution.
Edge Finder
An edge finder (sometimes called a wiggler) goes into the spindle of the milling machine and is used to locate the exact edge or centerline of a workpiece before machining begins. You can’t just eyeball where to start your cut. The edge finder gives you a precise reference point so your G-code coordinates match up with the actual part. Mechanical edge finders are inexpensive and reliable; as you advance, electronic edge finders provide a visual or audible signal that’s faster to use.
Deburring Tool
Every machined part has sharp edges and burrs after cutting — they’re unavoidable. A hand deburring tool with a rotating blade removes those burrs cleanly without file marks. You’ll reach for this constantly. It’s one of the cheapest tools you’ll buy and one of the most used.
File Set
Even with a deburring tool, a set of files covers situations the rotating blade can’t: narrow slots, inside corners, and heavier material removal. A basic set of machinist’s files (flat, half-round, round, triangular) in medium and fine cuts handles most shop finishing work.
Hex Key (Allen Key) Set
Machine tool holders, vise jaws, clamps, and fixturing hardware all use hex-socket cap screws. A quality set of inch-fractional and metric hex keys keeps you from being stuck when you encounter a fastener your set doesn’t cover. Ball-end hex keys let you work at an angle, which is useful when accessing fasteners in tight spaces.
Permanent Markers and Layout Fluid
For marking reference lines, identifying parts, and quick visual checks, these are small consumables you’ll always want on hand in your toolbox.
Toolbox or Tool Case
Precision measuring tools need protection from shop grit, chips, and impact. Even an entry-level toolbox with foam-lined drawers keeps your calipers and micrometers from getting dinged up and losing calibration. Start with something organized — the habit of putting tools back in the right place pays off as your kit grows.
Power Tools & Specialty Equipment
Once you’re past the basics, you’ll start adding tooling and accessories that expand what you can set up and run. Some of these come with your training program; others you’ll acquire over time as your work demands them.
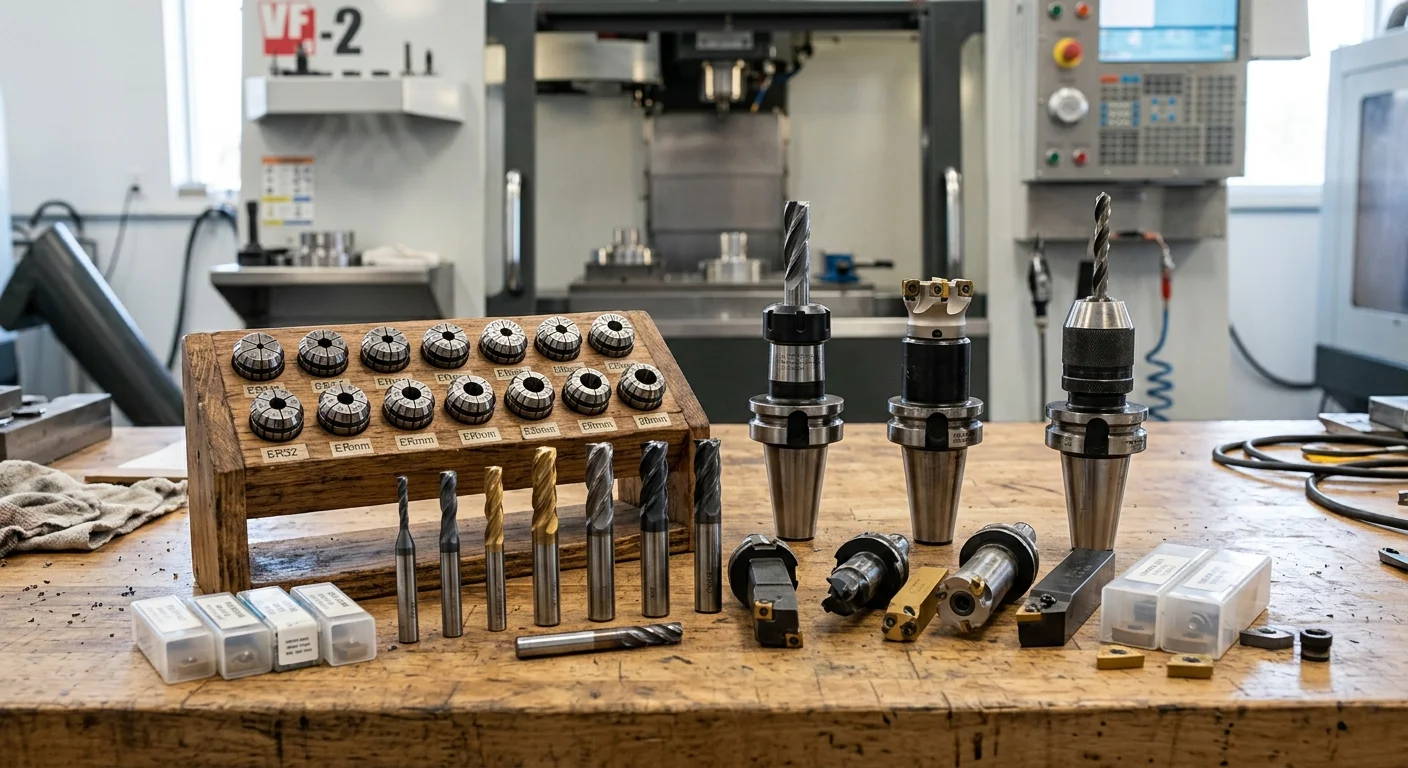
Collet Sets and Tool Holders
CNC mills use tool holders to secure cutting tools in the spindle. ER collets are the most common type — they grip the tool shank and provide concentricity within a few thousandths. A set of ER collets in common sizes (matched to your machine’s spindle taper — ER32 and ER40 are typical) lets you hold a wide range of tooling. You’ll also encounter end mill holders, drill chucks, and face mill adapters as your work broadens.
Cutting Tools: End Mills, Drill Bits, Inserts
Cutting tools are consumables — they wear out and get replaced. But machinists typically own a starter set of common end mills (2-flute for aluminum, 4-flute for steel, ball-nose for contoured surfaces) and drill bits they take from job to job or keep on hand for common operations. Indexable insert tooling uses replaceable carbide inserts in a steel body — when the insert edge dulls, you rotate or replace the insert rather than the whole tool.
Tap and Die Set
Threading is a routine part of machining — tapping threaded holes, chasing damaged threads on existing parts. A set of taps and dies in both inch-fractional and metric sizes covers most work. A tap wrench or T-handle provides controlled torque when cutting threads by hand.
Surface Plate and Height Gauge
A granite surface plate provides a flat, stable reference surface for layout work and measurement. A height gauge mounted on the surface plate measures part heights, scribes layout lines, and verifies machined features. These two tools work together and are standard equipment in any inspection or setup area. Granite is used because it’s dimensionally stable and resists wear better than steel.
Indicator-Style Center Finder (3D Touch Probe)
More advanced than a mechanical edge finder, an electronic touch probe or 3D sensor provides precise center-finding and edge location with audible or visual feedback. These are particularly useful on CNC mills when dialing in fixtures or finding the center of an existing hole. You likely won’t need this on day one, but it becomes a time-saver as you take on more complex setups.
Safety Gear & PPE
Machine shops have real hazards: flying chips at high velocity, rotating spindles, coolant mist, and machinery that doesn’t stop quickly. Your PPE is not negotiable — shops that take safety seriously won’t let you operate equipment without it. According to OSHA’s machine shop safety standards, appropriate guarding and PPE are required for all machine operators.
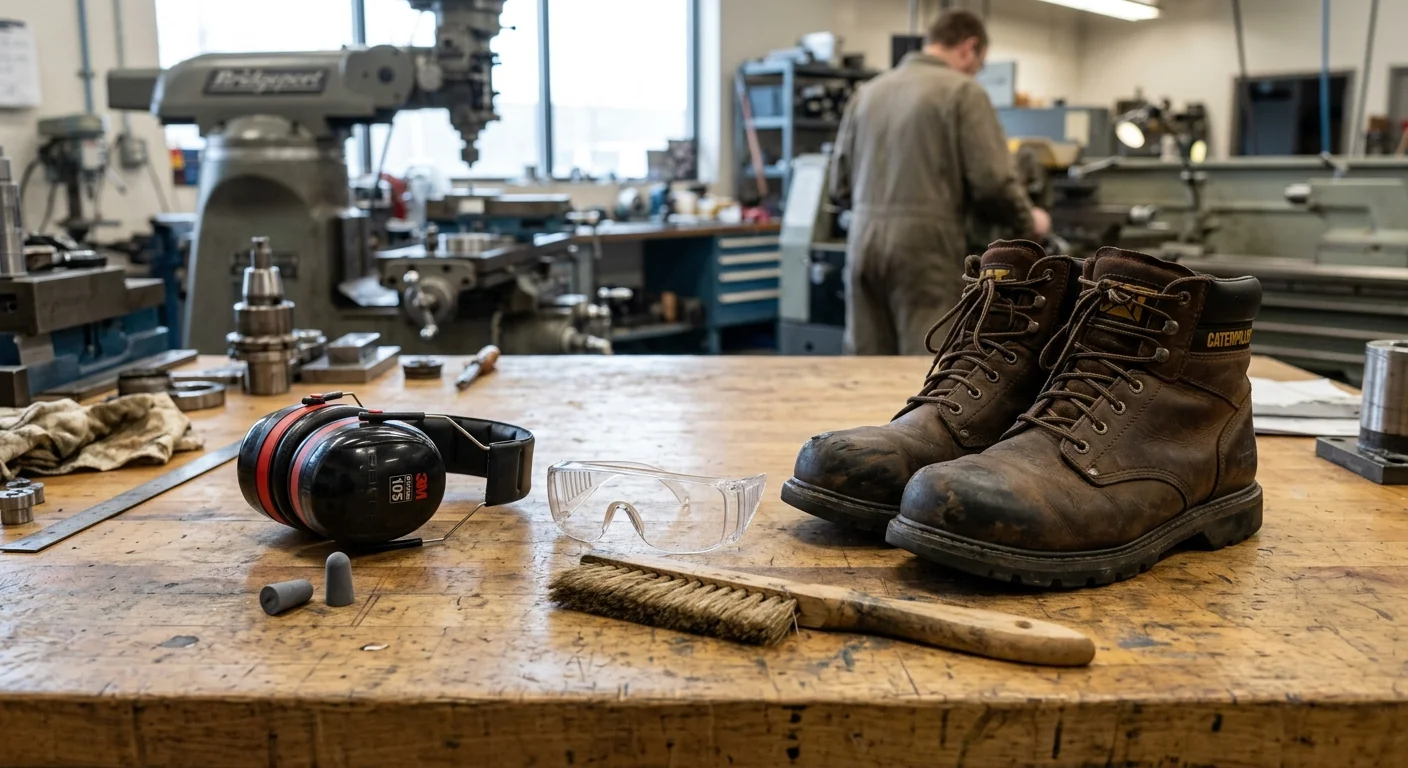
Safety Glasses
The single most important item. In a machine shop, chips fly in unexpected directions and at high speed. ANSI Z87.1-rated safety glasses (or better) are required any time you’re near a running machine. Wraparound protection is better than standard-frame glasses. Anti-fog coating is worth the small premium if your shop uses flood coolant, since temperature changes create fogging. Buy a few pairs — they get scratched, lost, and left in the wrong place.
Chip Guards and Machine Guarding
Most CNC machines come with enclosures or splash guards that contain chips and coolant during a cut. Always keep these in place when the machine is running. If you’re working on an older machine or open-bed setup, a freestanding chip shield provides a barrier between you and the work zone.
Steel-Toe Work Boots
You’re working around heavy parts, vises, and workholding equipment. Dropping a steel vise jaw or a solid aluminum billet on an unprotected foot is a serious injury. Steel-toe or composite-toe boots rated for the shop environment are standard PPE. Look for slip-resistant soles as well — coolant on a concrete floor is slippery.
Hearing Protection
According to OSHA’s noise exposure standards, workers should not be exposed to more than 90 dB over an 8-hour shift without hearing protection. CNC machines running at high spindle speeds, coolant pumps, and shop air systems can push noise levels well past that threshold. Foam earplugs or earmuffs rated at 25+ NRR are practical and inexpensive protection for a hazard that accumulates invisibly over years.
Close-Fitting Clothing, No Jewelry
Rotating spindles will catch loose sleeves, dangling drawstrings, and jewelry in an instant. Wear close-fitting clothing when operating machines — no hoodies with loose cords, no open-cuff shirts, no rings or bracelets. Tie back long hair. This sounds basic, but it’s one of the most common safety oversights in shops where people get complacent.
Cut-Resistant Gloves (for Material Handling)
A note on gloves: do not wear gloves while operating a running machine. Rotating machinery can grab a loose glove and pull your hand in. However, gloves are appropriate when handling raw stock with sharp edges, moving heavy workpieces, and loading/unloading parts. Keep a pair of cut-resistant gloves nearby for handling — and take them off before you touch the machine controls.
What to Look For When Buying
This section is intentionally brand-agnostic. Tools are a personal investment, and preferences develop over time. What matters most is understanding what separates a tool worth buying from one that will frustrate you or fail early.
Calipers (Digital and Dial)
What they do: Measure inside, outside, depth, and step dimensions quickly.
Key features to compare: Resolution (0.001” is standard, 0.0001” is available for finer work), jaw material (hardened steel holds its shape), dust and coolant resistance (IP rating if you’re working in a wet environment), jaw alignment quality (cheap calipers have slop in the beam that causes measurement error). For digital models, check that the display is readable under shop lighting.
Price range: $25–$80 for a quality digital or dial caliper. Avoid the very cheapest options — the jaws and beam are often not machined accurately enough for reliable measurements.
Micrometers
What they do: Measure external dimensions to ±0.0001” resolution.
Key features to compare: Spindle straightness and thread quality (affects accuracy), thimble feel (smooth, consistent feel means the thread is well-made), ratchet stop or friction thimble (prevents overtightening and false readings), carbide-tipped anvil and spindle faces (more wear-resistant). Sets include a calibration standard (gauge block) for verification.
Price range: $40–$120 per micrometer for a quality instrument. A 3-piece set (0–3”) runs $120–$300.
Dial Indicators and Magnetic Bases
What they do: Detect runout, misalignment, and surface variation during setup.
Key features to compare: Plunger travel range (0.5” is common; more range gives more flexibility), resolution (0.001” for general setup, 0.0001” for precision work), repeatability (cheap indicators have sloppy gearing), magnetic base holding strength (a weak base loses grip during vibration). The indicator and base need to work together — a strong base with a cheap indicator still limits your accuracy.
Price range: $20–$60 for a basic dial indicator; $30–$80 for a quality magnetic base. Combination sets run $50–$120.
Edge Finders
What they do: Locate the edges and centerlines of workpieces on a mill.
Key features to compare: Tip diameter (0.200” is most common), tip concentricity (determines locating accuracy), material (hardened tool steel is durable), whether it’s mechanical or electronic. Electronic edge finders provide a beep or LED indication and can be faster to use, especially for beginners still developing the feel for mechanical edge finding.
Price range: $10–$20 for a mechanical edge finder; $30–$100 for electronic types.
Deburring Tools
What they do: Remove burrs and sharp edges from machined parts.
Key features to compare: Blade rotation quality (should rotate smoothly under light pressure), blade replacement availability (replaceable blades extend tool life), handle grip (you’ll use this all day), blade compatibility with different materials. Most quality deburring handles accept a range of blade styles for different applications.
Price range: $15–$40 for a good deburring tool with extra blades.
Collet Sets and Tool Holders
What they do: Secure cutting tools in the machine spindle with precise concentricity.
Key features to compare: Taper compatibility (must match your machine’s spindle — BT30, BT40, CAT40, R8 are common), collet concentricity specification (lower TIR is better), material and heat treatment (determines holding force and durability), runout specification (relevant for finish machining). ER collets are widely used and interchangeable across many machine brands.
Price range: $8–$25 per ER collet; complete sets of common sizes run $50–$150. Tool holders (collet chucks, end mill holders) run $30–$150+ depending on taper and quality.
Safety Glasses
Key features to compare: ANSI Z87.1 rating (required — verify, don’t assume), wraparound lens coverage, anti-scratch and anti-fog coatings, weight and comfort for extended wear.
Price range: $5–$25. Buy several pairs. Scratched lenses reduce visibility, and you’ll want a clean pair available.
Steel-Toe Boots
Key features to compare: ASTM F2413 rating (the standard for protective footwear), steel vs. composite toe (steel is heavier but provides better protection at the toe; composite is lighter and non-conductive — either is appropriate for most machine shops), slip-resistant outsole rating, ankle support for long shifts on concrete.
Price range: $80–$200. This is not where to cut corners. Quality boots last 2–3 years with regular use.
Budget Guide
What you spend depends on your program’s requirements, your shop’s tool supply situation, and where you are in your training. Here’s a realistic breakdown:
Student Starter Kit: $300–$600
This covers the measuring tools and hand tools you need from day one of a CNC program: a set of digital or dial calipers, a 0–1” outside micrometer, a dial indicator and magnetic base, an edge finder, a deburring tool, a file set, a hex key set, and basic PPE (safety glasses, ear protection). At this budget, you’re buying functional tools — not the cheapest available, but mid-grade instruments that will hold up through a training program and serve you well into your first job.
If your program provides certain tools (some schools have loaner setups for surface plates and height gauges, for example), you can trim costs accordingly.
Working Machinist Setup: $1,500–$4,000+
A fully equipped machinist carries a broader range of micrometers (0–3” set at minimum), a height gauge, a surface plate, a more sophisticated indicator setup, a collet set matched to their primary machine, a personal set of cutting tools, and professional-grade PPE including quality boots and fitted hearing protection. Costs scale based on the types of work — shops doing aerospace or medical device work often expect machinists to have more measurement capability than general manufacturing shops.
The good news: most machinists build this kit gradually as they encounter specific needs on the job. Don’t feel pressure to own everything on the professional list before your first week. Start with the measurement basics, add what the work demands.
Tool Care & Maintenance Tips
Precision measuring instruments are not just tools — they’re calibration standards. If they’re out of calibration, every measurement you take is suspect, and scrap follows.
Keep measuring tools clean and dry. Chips, coolant, and grit on caliper jaws introduce error. Wipe jaws clean before and after each measurement. According to Tormach’s machinist guide, even small particles on contact surfaces cause false readings when measuring tight tolerances.
Never drop micrometers or calipers. Even a short drop onto a concrete floor can bend the frame or misalign the jaws enough to throw the instrument out of calibration. Store them in their cases when not in use, not loose in a toolbox drawer.
Check calibration regularly. Digital calipers have a zero function — use it. Micrometers should be checked with a gauge block or a known standard before critical measurements. If an instrument reads incorrectly against a known standard, it needs calibration or replacement.
Store dial indicators off the plunger. Leaving a dial indicator compressed against a surface wears the spring over time. When storing, position the indicator so the plunger is fully extended.
Keep cutting tools organized and protected. End mills with chipped or worn cutting edges don’t just produce poor surface finishes — they can break and become a projectile hazard. Keep cutting tools in holders or foam inserts, not loose in a drawer where edges get dinged.
Clean and lubricate the magnetic base regularly. Shop grit on the base plate degrades magnetic contact with the machine table. Wipe the base clean and check that the locking mechanism holds firmly before any setup work.
Inspect taps before each use. A tap with a chipped flute will break in the hole — and extracting a broken tap is one of the most time-consuming problems in machining. Keep taps organized by size and condition, and retire worn or chipped taps before they become a problem.
Start Your CNC Machining Career
Having the right tools is the foundation, but it’s only part of the picture. If you’re still deciding whether CNC machining is the right path — what the day-to-day work looks like, what the earning potential is, and how training programs prepare you for the job — read our full guide on CNC machining career opportunities.
The field is growing, with demand driven by aerospace, defense, medical device manufacturing, and the reshoring of industrial production. Machinists who understand both the machine and the measurement — and who show up with the right tools and the habit of using them correctly — are exactly what shops are looking for.
Sources
- Tormach — “Precision Matters: Essential Measurement Tools for Machinists” — https://tormach.com/articles/precision-matters-essential-measurement-tools-for-machinists
- Penn Tool Co. — “Must-Have Measuring Instruments for CNC Machining and Metalworking” — https://www.penntoolco.com/blog/measuring-tools-cnc-machining-metalworking
- OSHA — “General Requirements for All Machines” (1910.212) — https://www.osha.gov/laws-regs/regulations/standardnumber/1910/1910.212
- OSHA — “Occupational Noise Exposure” (1910.95) — https://www.osha.gov/laws-regs/regulations/standardnumber/1910/1910.95
- MSC Industrial — “4 Workplace Safety Tips for CNC Machinists” — https://www.mscdirect.com/betterMRO/4-essential-workplace-safety-tips-cnc-machinists
- CNC Cookbook — “Machinist Tools Set: Essential List” — https://www.cnccookbook.com/machinist-tools-set-essential-list/