Walk into any welding shop and you’ll see something that takes beginners by surprise: the tool setup varies a lot from one welder to the next. One person runs MIG and keeps a simple kit. Another specializes in TIG on exotic metals and has a completely different set of gear. What they share is a set of core tools that every welder, regardless of specialty, relies on every single day.
If you’re entering a welding program or apprenticeship, you don’t need to replicate a veteran’s full kit right away. But you do need to show up with the right basics. Your program will likely have a required tool list; always follow that first. This guide will help you understand what’s on that list and why, what to add as your skills grow, what to look for when buying, and how to keep everything in good shape for the long haul.
The welding trade rewards precision and care. The same attention you’ll learn to give your welds applies equally to your tools.
Day-One Essentials
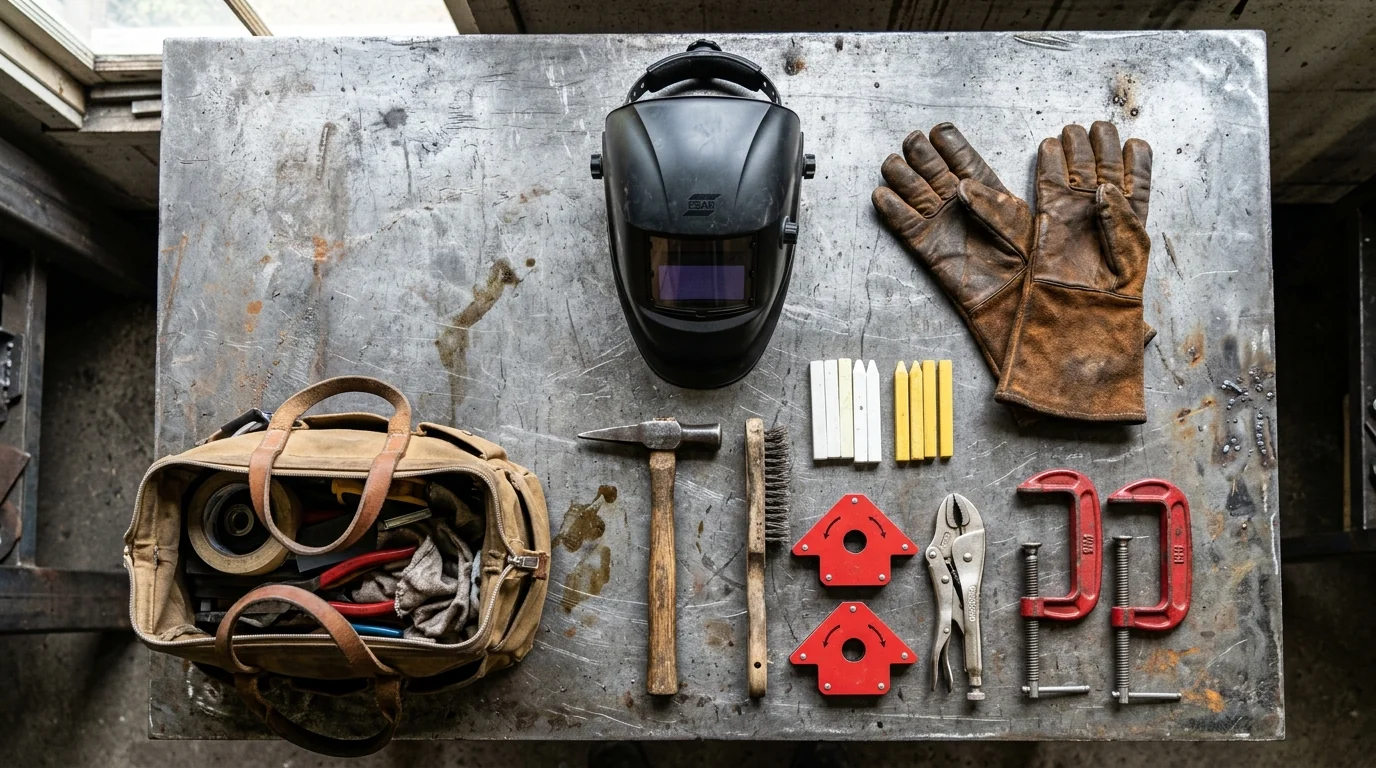
These are the hand tools and accessories you’ll use from your first day in training. They handle the prep work, cleanup, and basic positioning tasks that surround every weld.
Welding Helmet
Your helmet is the piece of safety equipment you’ll use more than anything else. An auto-darkening helmet is the standard choice today. The lens transitions from a light state to a darkened shade the moment the arc strikes, which means you can position yourself and see your workpiece clearly before starting. Fixed-shade helmets require you to nod the helmet down into position while already lined up, which is workable but more awkward. Most programs will specify or allow either; auto-darkening is worth the extra cost for comfort and safety.
Welding Gloves
Welding gloves protect your hands from heat, UV radiation, sparks, and spatter. The type matters depending on the process. MIG and Stick welding produce significant spatter and heat, so thicker leather gauntlet-style gloves are standard. TIG welding requires precision finger control, so thinner, lighter gloves give better dexterity at the cost of slightly less bulk protection. Buy gloves suited to what your program focuses on, and inspect them before each use. Worn-through fingertips or cracked leather means they need to be replaced.
Welding Jacket or Leather Apron
Exposed skin around a welding arc gets burned. UV radiation from the arc causes arc flash burns on skin, the same effect as severe sunburn, even from brief exposure. A leather jacket or a flame-resistant (FR) cotton jacket covers your torso and arms. Leather offers maximum heat and spark resistance. FR cotton is lighter and cooler, which matters on hot job sites. Both are legitimate choices; your training environment and the type of welding you’re doing will guide which is more practical.
Clamps and Magnetic Squares
Before you weld anything together, it has to be held in position. Clamps and magnetic squares keep metal pieces aligned while you tack and weld. C-clamps and locking pliers (vise grips) are basic and versatile. Magnetic squares hold pieces at precise angles (90 degrees, 45 degrees) and are especially useful when you’re working alone. You’ll use at least a few of these from day one.
Chipping Hammer
If you’re doing Stick (SMAW) or flux-core welding, a chipping hammer is non-negotiable. These processes produce slag: a solidified layer that covers the weld bead as it cools and protects it from atmospheric contamination. That slag has to be removed before you can clean the weld or add another pass. The chipping hammer’s pointed tip gets into the weld bead, and the flat chisel end handles the edges. Chip away the slag, then follow up with a wire brush.
Wire Brush
After chipping, a wire brush removes the remaining slag residue and surface oxides. When brushing stainless steel or aluminum, you need a wire brush dedicated only to that material. Using a carbon steel wire brush on stainless cross-contaminates the surface and can cause corrosion in the weld area. Keep brushes organized and clearly labeled if you’re working with multiple metal types.
Soapstone and Metal Markers
Welding happens on metal, and regular markers burn off immediately. Soapstone pencils (also called chalk) and metal-safe markers let you mark cut lines, weld positions, and measurement points that hold up under heat. Soapstone is the traditional choice; silver streak markers and paint pens work well for less heat-intensive marking. A few pieces of soapstone in your kit costs almost nothing and is used constantly.
Pliers and Wire Cutters
Standard pliers handle general tasks: bending, gripping, pulling wire. Wire cutters trim MIG wire cleanly when you need to start a new weld or change wire length. You don’t need specialty pliers, but a solid pair of locking pliers (vise grips) doubles as an extra clamp when you run out of C-clamps.
Tool Bag or Welding Tote
Getting organized early builds good habits. A canvas or leather welding tote keeps your hand tools accessible and protects them from the shop environment. Look for something with an open-top design. Deep bags where everything sinks to the bottom slow you down.
Power Tools & Specialty Equipment
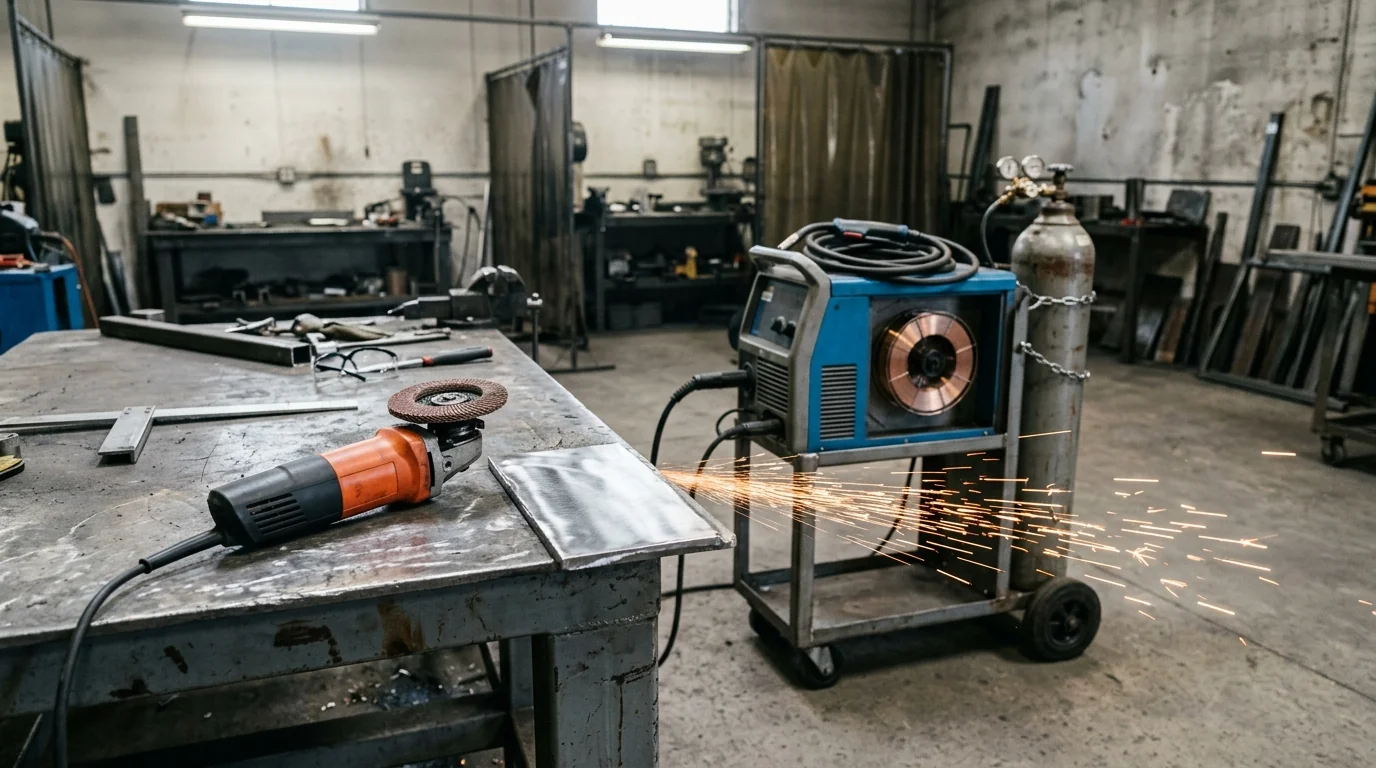
Once you’re past the basics, a few power tools expand what you can do significantly.
Angle Grinder
The angle grinder is arguably the most-used power tool in welding. Before a weld, you use it to clean rust, mill scale, and paint off metal surfaces. After a weld, you use it to grind down excess buildup, blend welds into the base material, and remove spatter. A 4.5-inch or 5-inch angle grinder covers most welding shop work. You’ll go through grinding wheels and flap discs regularly, so factor consumables into your budget. A cutting disc attachment also lets you cut metal stock when a saw isn’t available.
Welding Machine (MIG, TIG, or Stick)
If you’re in a training program, the shop will provide welding machines. If you’re building a home shop or purchasing your own equipment, here’s a quick overview of the main processes:
-
MIG (GMAW): The easiest process to learn. Wire feeds automatically, the machine handles many of the variables, and it works well on mild steel, stainless, and aluminum. Requires a shielding gas supply. A good starting point for beginners.
-
Stick (SMAW): The most portable and setup-light of the arc processes. No shielding gas required, just electrodes. Less forgiving of poor technique than MIG, but the machines are simpler and less expensive. Works well outdoors because wind doesn’t blow away the slag-based shielding.
-
TIG (GTAW): The most precise of the three, used for thin materials, stainless steel, aluminum, and applications where weld appearance matters. Requires the most hand skill: you hold the torch in one hand and feed filler rod with the other while controlling a foot pedal. Slower, but capable of the cleanest results.
Most trade programs teach MIG first, add Stick, and then introduce TIG for students who want to specialize. If you’re buying a first machine for practice at home, a small MIG welder gets you the most capability for the money.
Angle Die Grinder
A smaller, pencil-like grinder that reaches into tight spots where an angle grinder won’t fit: inside corners, pipe intersections, and confined weld seams. Not day-one equipment, but you’ll reach for it regularly once you’re doing varied fabrication work.
Welding Table or Positioner
A flat, square welding table makes setups faster and more accurate. Purpose-built welding tables have a slotted or threaded surface that holds clamps and fixtures in place. If your school doesn’t have dedicated welding tables, you’ll improvise with flat steel plate. Having your own setup at home is worth it if you’re practicing seriously.
Safety Gear & PPE
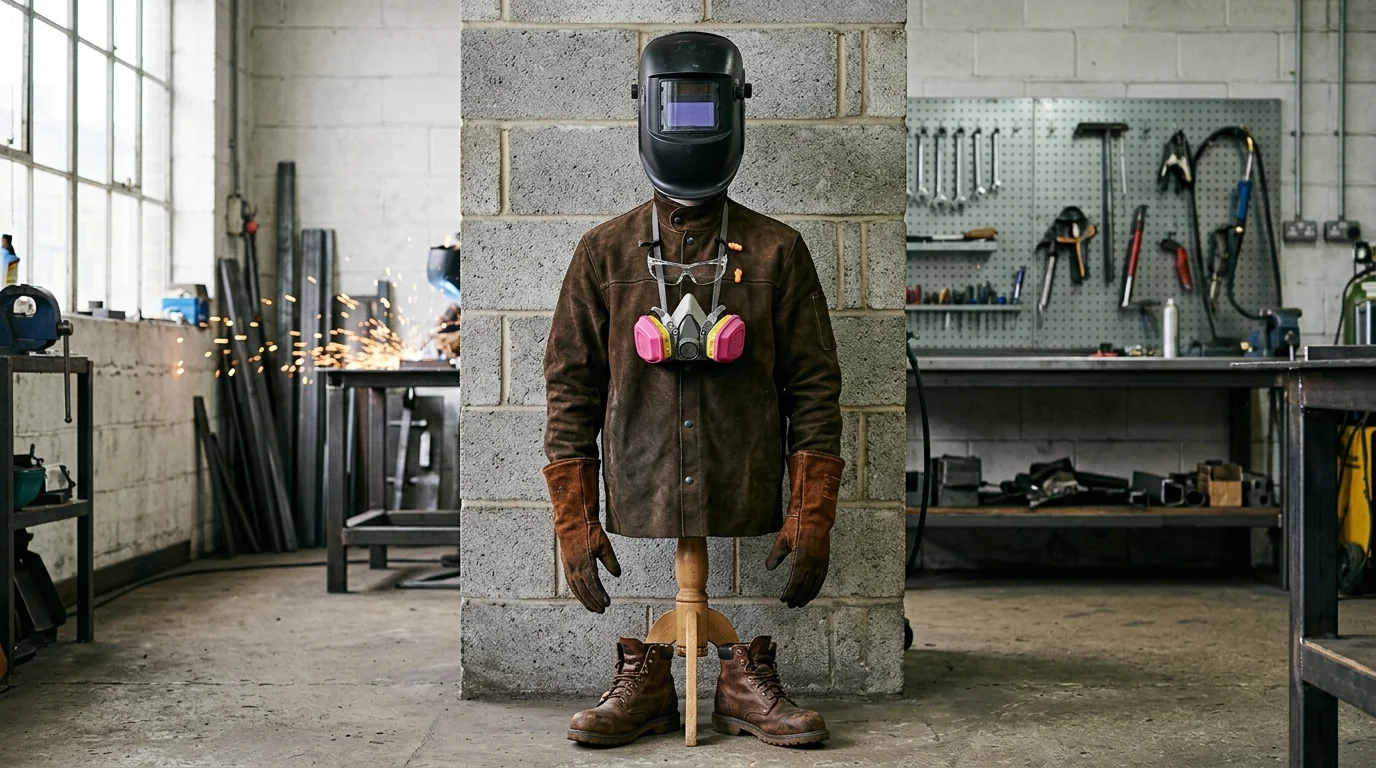
Welding produces UV radiation, infrared radiation, heat, sparks, fumes, and noise. The PPE requirements aren’t bureaucratic box-checking. Each item addresses a real and specific hazard.
Auto-Darkening Welding Helmet
Covered above in essentials, but worth emphasizing here: the ANSI Z49.1-2021 standard, developed by the American Welding Society, governs safety in welding and cutting operations and specifies eye and face protection requirements. Your helmet must be rated for the shade levels appropriate to your process. Shade 10 covers most MIG and Stick welding; TIG at lower amperages may use shade 8 or 9.
Safety Glasses
Wear safety glasses under your helmet, not instead of it. When grinding, chipping, or brushing, your helmet is up and debris flies. ANSI Z87.1-rated safety glasses are required on any legitimate job site or shop. Get a pair with side shields.
Leather Welding Gloves
OSHA standards for welding (29 CFR 1910 Subpart Q) require hand protection appropriate to the hazard. Leather gloves rated for welding are the baseline. Some welders add leather sleeves over their jacket sleeves for extra arm protection during overhead work.
Flame-Resistant Clothing
Cotton and wool of dense weave are safe for welding. Synthetics (polyester, nylon, acrylic) are not. They can melt into skin on contact with sparks. FR-treated cotton and leather are both appropriate. Never wear synthetic athletic wear or hoodies under your welding jacket.
Leather Work Boots
Boots should be leather (not mesh or synthetic) with steel or composite toes. Low-cut shoes leave your ankles exposed to spatter. Avoid lace-up boots with exposed loops that can catch hot spatter. Tuck your pants into your boots or wear boot covers when doing heavy overhead work.
Respiratory Protection
Welding fumes are a genuine health hazard. Many training programs have ventilation systems (fume extractors, exhaust hoods, and shop ventilation) that handle this. When ventilation is inadequate or you’re welding outdoors in variable wind, a half-face respirator with appropriate filter cartridges provides protection. For stainless steel welding (which produces hexavalent chromium fumes) and galvanized steel (zinc oxide fumes), respiratory protection is important regardless of ventilation.
Hearing Protection
Grinding is loud. Plasma cutting is louder. Keep a pair of earplugs or earmuffs in your kit for extended grinding work or high-noise shop environments.
What to Look For When Buying
This section is brand-agnostic. The goal is to help you compare tools on the features that matter, so you can make a sound decision regardless of what’s on sale.
Auto-Darkening Welding Helmet
What it does: Protects your eyes and face from arc radiation, UV, infrared, sparks, and debris. The lens darkens automatically when an arc is detected.
Key features to compare: Shade range (most helmets darken to shade 9–13; helmets with a grinding mode at shade 3–4 add versatility), number of arc sensors (four sensors give better coverage than two, especially for out-of-position welding), switching speed (faster is better; look for 1/25,000 second or faster for the lens-to-dark transition), optical clarity class (1/1/1/1 is the highest rated), viewing area size (larger is more comfortable), and power source (solar with battery backup lasts longer than battery-only).
Price range: $50–$150 for a capable student/apprentice helmet. $200–$500+ for professional models with larger viewing areas, higher optical ratings, and better durability.
Welding Gloves
What they do: Protect hands from heat, UV, sparks, and spatter.
Key features to compare: Leather type (split leather is more economical, grain leather is more durable and supple), cuff length (gauntlet-style gives better arm protection), fit (gloves that are too large reduce control and can catch on things), and process suitability (TIG-specific gloves are thinner and more tactile; MIG/Stick gloves are bulkier and more heat-resistant).
Price range: $15–$40 for MIG/Stick gloves. $20–$60 for TIG gloves.
Welding Jacket or Leather Apron
What it does: Protects torso and arms from UV radiation, spatter, and heat.
Key features to compare: Material (leather is maximum protection; FR cotton is cooler and lighter), coverage (a full jacket is better than an apron for most work), fit and mobility (you need to move freely to weld in odd positions), and collar design (a high collar or snap-up option protects your neck).
Price range: $40–$100 for FR cotton jackets. $80–$200 for leather welding jackets.
Angle Grinder
What it does: Grinds, smooths, cuts, and cleans metal surfaces before and after welding.
Key features to compare: Disc size (4.5” handles most welding shop work; 5” for heavier stock), power (corded grinders have more consistent power; cordless is convenient but loses torque on battery), guard design (an adjustable guard is safer), and compatibility with common wheel and disc types (grinding wheels, flap discs, cutting wheels, wire cup brushes).
Price range: $30–$80 for a capable corded model. $80–$200 for a cordless version with battery.
Clamps and Magnetic Squares
What they do: Hold metal in position while you tack and weld.
Key features to compare: Jaw opening range on C-clamps (broader is more versatile), grip strength on locking pliers, magnet strength on magnetic squares (heavier is generally better, though very heavy magnets get awkward), and whether magnetic squares have an off switch (makes repositioning much easier).
Price range: A basic starter set of 4–6 C-clamps and 2–3 magnetic squares runs $40–$80.
Chipping Hammer and Wire Brush
What they do: Remove slag and residue from Stick and flux-core welds.
Key features to compare: Handle material (spring steel handles absorb shock better than rigid handles), tip shape (pointed plus flat chisel covers all common slag types), wire type on brush (match to base metal: steel brush for carbon steel, stainless steel brush for stainless and aluminum).
Price range: $10–$25. Some come as a two-in-one combo tool.
Respiratory Protection (Welding Respirator)
What it does: Filters welding fumes and particulates when ventilation is insufficient.
Key features to compare: Half-face vs. full-face (half-face fits under a welding helmet; full-face is for grinding and plasma operations), cartridge type (P100 particulate plus OV/acid gas combination cartridges cover most welding fume types), fit and seal (a respirator that doesn’t seal properly doesn’t protect you), and NIOSH approval (required for any legitimate respirator).
Price range: $25–$60 for a half-face respirator body. Replacement cartridges run $15–$30 per pair.
Budget Guide
What you spend depends on what your program requires, whether you’re building a home practice setup, and whether you’re starting with hand tools only or including a welding machine.
Student Starter Kit: $300–$700
This covers the hand tools and PPE you’ll use in a school or apprenticeship setting where machines are provided: auto-darkening helmet ($80–$150), welding gloves ($20–$40), FR jacket or leather apron ($60–$120), safety glasses ($10–$20), clamps and magnetic squares ($40–$80), chipping hammer and wire brush ($15–$25), soapstone and markers ($10), and a tool tote ($30–$60). At this budget, you’re buying mid-grade gear: solid enough for daily program use, not premium professional equipment.
Adding an Angle Grinder: $50–$150 additional
An angle grinder with a few grinding wheels and flap discs rounds out your capability for prep and post-weld cleanup. If your program’s shop has grinders available, you can defer this.
Home Practice Setup: $800–$2,000+
Adding a basic MIG welding machine ($300–$700 for a capable student machine) to the starter kit above gives you a full home practice setup. Include a welding table or sheet of flat steel plate, a small wire spool, and shielding gas (cylinder plus regulator runs $100–$200 to set up).
Professional Setup: $2,000–$5,000+
A working professional’s kit includes higher-grade PPE, a multiprocess welder capable of MIG, TIG, and Stick, a proper welding table, a full set of clamps and fixtures, a quality angle grinder, fume extraction if working in an enclosed space, and consumables stocked in depth. TIG-specific additions (a foot pedal, TIG torch kit, and various filler rod alloys) add further cost. Professionals also typically carry redundant PPE (spare gloves, extra helmet lenses) so a failure mid-job doesn’t stop the work.
You build this over time. Nobody walks in on day one with a $5,000 kit. Buy what your program requires, invest in quality PPE first, and expand your tools as your work demands it.
Tool Care & Maintenance Tips
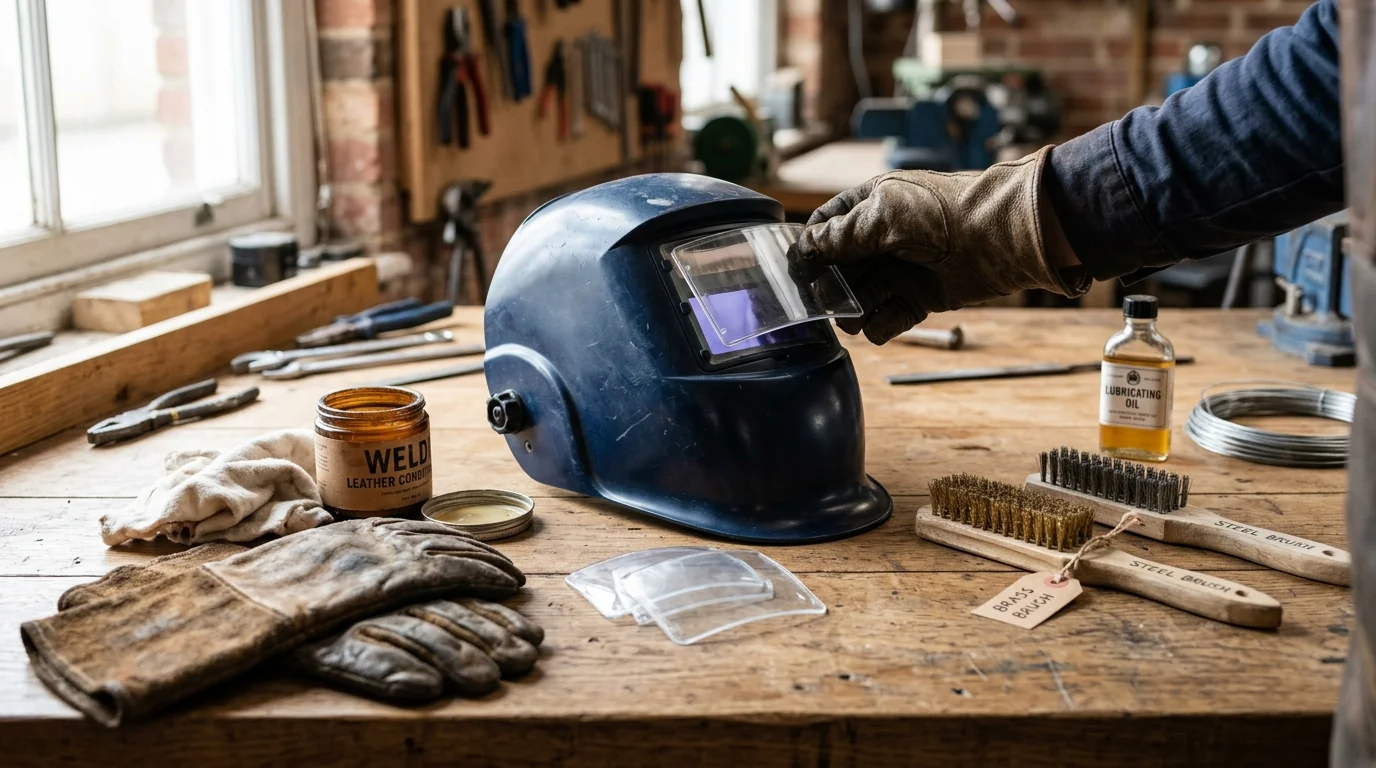
Welding tools live in a rough environment: heat, sparks, grit, and physical abuse. Taking care of them pays off in reliability and longevity.
Inspect your helmet lens after every use. Check for spatter on the outer cover lens (a replaceable, inexpensive shield that protects the auto-darkening cartridge). Replace the cover lens when it’s too pitted or fogged to see through clearly. Never weld through a damaged lens. Clarity matters for seeing the weld puddle accurately.
Test your helmet’s auto-darkening before you weld. Cover the arc sensors and check that the lens darkens when you simulate a bright light source. A helmet that fails to darken during an arc is a serious eye hazard. Most helmets have a sensitivity and delay adjustment; calibrate these to your environment and process.
Wash your welding gloves occasionally. Leather gloves accumulate grease, metal dust, and oil over time. A mild leather cleaner and conditioner keeps the leather supple and extends its life. Inspect the fingertips and palm areas regularly. Worn-through leather on a glove exposes your hand to burns.
Store your jacket and gloves away from direct sunlight. UV degrades leather and FR fabric over time. Hang your jacket in a cool, dry location rather than leaving it draped over equipment in the shop.
Clean your wire brush and keep process-specific brushes labeled. Cross-contaminating a stainless steel wire brush with carbon steel work can cause rust and weld defects on future stainless jobs. Keep brushes marked or separated.
Maintain your angle grinder discs and wheels. According to FABRICAST’s guide on essential welding tools, inspect grinding wheels before use. A cracked or damaged wheel can shatter at high RPM. Don’t use a disc past its rated life. Store wheels in a dry location away from impact.
Keep your helmet’s battery or solar cell functional. Some helmets use small button batteries; others charge via solar panel during use. A dead battery means the lens stays fixed, so check function before every session. Keep a spare battery in your kit if your model requires one.
Check clamp and vise grip threads periodically. Weld spatter and grit work into threads and adjustment mechanisms over time. A quick clean and light oil application keeps them functioning smoothly.
Start Your Welding Career
Knowing your tools is one part of getting ready. The bigger picture (what welding work actually looks like, what specializations pay the most, and how to get into a program) is covered in our full guide on welding career opportunities.
If you’re still deciding between a trade school and an apprenticeship path, apprenticeships explained walks through how each route works and what to expect from both. And if you want to understand the certifications that matter at each stage of a welding career, from entry-level to Certified Welding Inspector, trade certifications and licenses covers what’s worth pursuing and when.
Welding is a trade where your tools and your skills develop together. Building a good kit gradually, as your work demands it, is how most working welders do it.
Sources
- WeldGuru — “18 Essential Welding Tools for Beginners (with Pictures)” — https://weldguru.com/welding-tool-list/
- FABRICAST — “Essential Tools Every Welder Should Own” — https://fabricast.net/essential-tools-every-welder-should-own/
- TRADESAFE — “Essential Welding PPE: A Complete Guide” — https://trdsf.com/blogs/news/welding-ppe
- OSHA — “Welding, Cutting, and Brazing — Standards” — https://www.osha.gov/welding-cutting-brazing/standards
- ANSI Blog — “ANSI Z49.1-2021: Welding Safety Standard” — https://blog.ansi.org/ansi/ansi-z49-1-2021-safety-in-welding/
- PrimeWeld — “Essential Tools for Welding at Home” — https://primeweld.com/blogs/news/essential-tools-for-welding-at-home